2. FAQ - How to get started with the Training Plan / Coaching
-
01. Process to train with us
There are 2 possibilities to train with us.
Option 1: Online coaching - your plan will be individually adapted to your weekly time budget and your previous training.
Option 2. training plan - you use a pre-written training plan and prepare yourself for a specific goal
To train you online a couple steps are necessary. Follow the steps in the instructions, marked steps require action from the athlete.
Procedure (ONLINECOACHING):
- Payment of the first invoice
- Obtaining the manual and documentation
- Reading the manual and documentation
- If necessary, create a FREE training account/user account on the TrainingPeaks platform and simultaneously connect to the trainer account via the Link.
- Receive a questionnaire from your coach
- Completion of the questionnaire and inform your coach after completion
- Phone call or video conference with the trainer and initial conversation
- Creating the first training week by your coach in the training platform
- Start your own training
PS: You should save the link to the questionnaire for the future, here your season planning is determined, as well as your test and competition results are saved.
Procedure (PreWritten TRAINING PLAN):
- Order and Pay of the invoice
- sharing the training plan by the trainer in the training platform
- Obtaining of the manual and documentation by download it from the 2nd Monday in your purchased training plan
- Reading the manual and documentation.
- We suggest to connect to the trainer account via the Link. if not done allready in the order process.
- Start your own training
-
02. Creating an online account at TrainingPeaks.
We are coaching via the training portal of TrainingPeaks, this sophisticated portal allows us as coaches and you as athletes various possibilities of interaction.
The first registration is done via this site,
How can you create an account to train with us?
1. Please follow the link and create a training account, at the same time the created athlete account will be connected to the trainer (training with system), https://home.trainingpeaks.com/attachtocoach?sharedKey=4V4TGK5YF6LSG
The link leads you to the following page.
If you already have an account at TrainingPeaks, only login via this page, if not, "create" a free basic account (sign up).
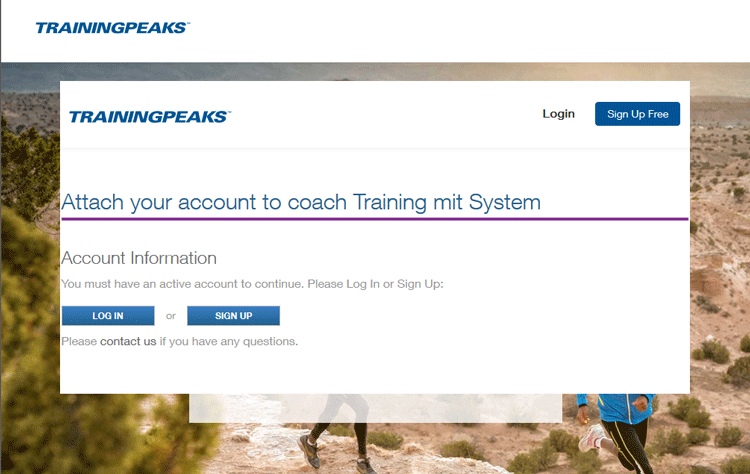
Under Account Setting ⇾ Account ⇾ Coaches ⇾ current Coach "Training with system" should be entered. If this is not the case, stay logged into your athlete account and follow the link again.
The permanently free basic account can also be used later without the connection to the coach.
The premium account with costs fulfills additional functions, which are not absolutely necessary for the training. After 2 weeks test phase the premium account is automatically set to the basic version.Your new account is in basic settings and connects directly to our trainer account.
2. The trainer receives information and now has access to your training calendar.
The distribution of the training plan / training sessions usually takes place within 2 working days. -
03. Reading the training sessions
After you have logged in to your training account at www.trainingpeaks.com,
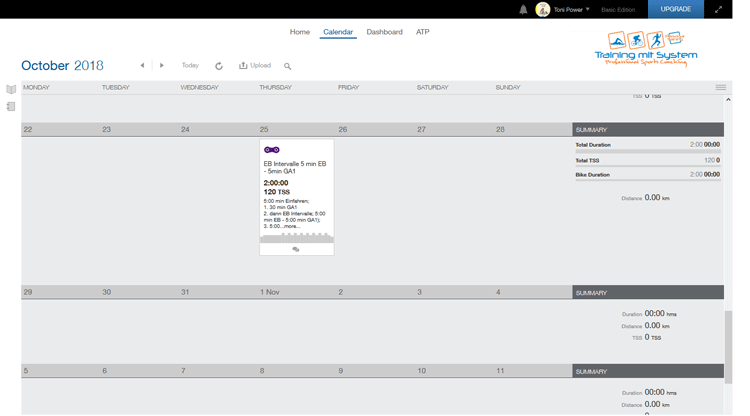
you see the calendar (top middle). Here you can see the calendar and the planned training session.
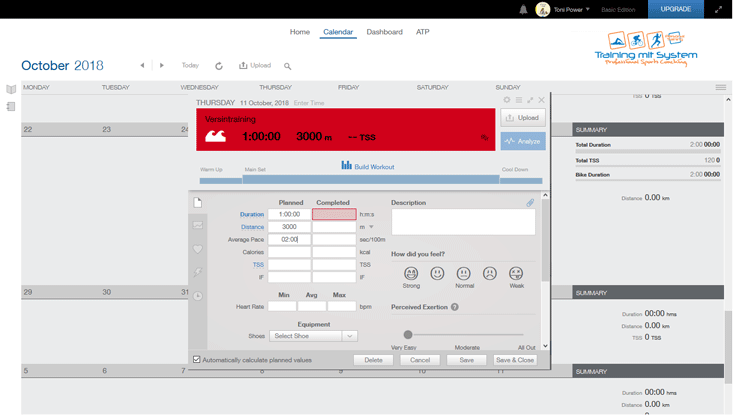
1. if no training session is planned, you can click on the day and enter your completed training if necessary ...
... and add a training session
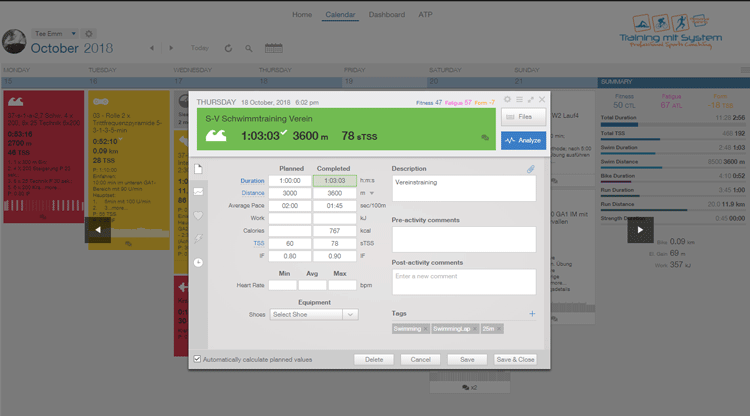
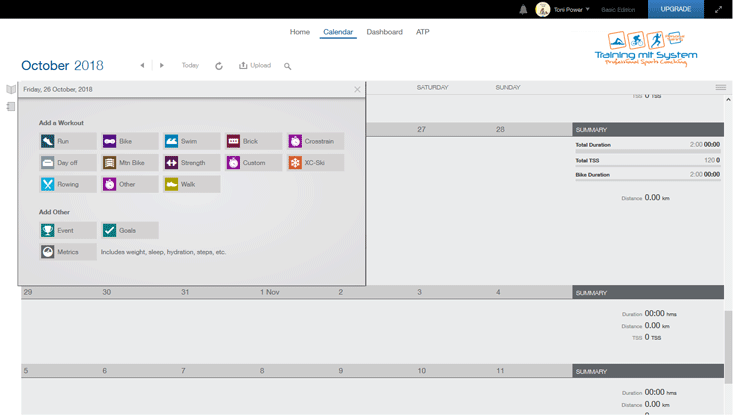 2. If a training session is planned, you can click on it, a pop-up window will open where you can read the details of the training. The training session can only be logged after the actually planned training, at the earliest on the current day. It is not possible to enter the data in the "Completed/Completed" window beforehand.
After completing the training session, you can automatically load them onto the training platform via Garmin Express or Polar flow, for example. Alternatively, you can manually upload the unit to the platform using the Upload button.
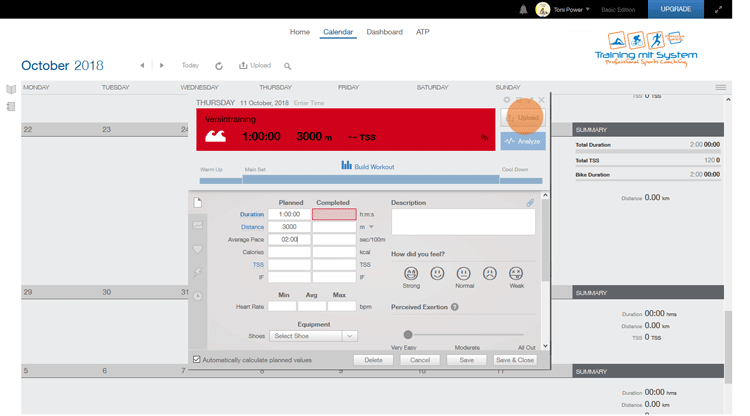 The uploaded training session is now compared, and an evaluation can take place. You should not forget to leave comments about the session, this helps us to evaluate the session, because behind every number you are also standing with your body feeling, which is necessary to evaluate the training.
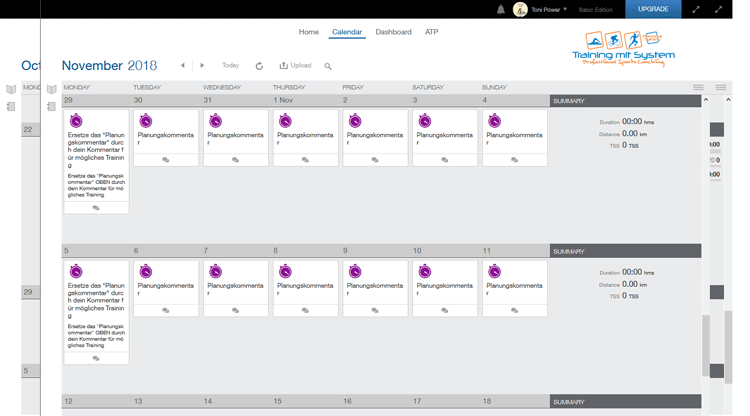
In the coaching option, future weeks contain a planning comment, here you should enter planning-relevant things that influence your regular training BEFORE the day of training planning by the coach.
For instance:
- Club swim training not applicable
- only 30 min time since business appointment
- no time since family obligations
- only loose training because of birthday party :-) -
04. Explanation of the details in the training session
The order of the training session on a day is always entered in the actuall recommended order by us.
Duration of training sessions
Cycling and Running
For most training session the duration is critical. As the length of the training can vary considerably depending on the performance level, profile or weather conditions. The distance is only fictitious entered and you should not be influenced by it or pay more attention to it.
In the immediate race preparation, special units are then also shown by distance, a special note is made here.In swimming the length of the course is significant, here the time is only fictitiously entered. Here the same applies as with cycling with the distance, this can deviate here depending upon efficiency degree substantially, you should not be influenced by it or pay too much attention to it.
However, the distance can still be used for statistical purposes.General information about the structure of the training sessions
Warm up and cool down belong to every training session in swimming, cycling and running. The listed training time includes Warm Up and Cool Down.
Only in the brick training, is a direct transition to the next sport. A brick training is explicitly listed in the first unit, in the description you will find the addition ... + "Brick Run", in addition it can be recognized by the lack of Cool down and Warm up.If 2 sports are supposed to be trained on one day, they should be trained, if possible, in the given order, but this is not obligatory but suggested.
Training Details / Contents / Time Information
In the overview the training is listed in the format (hh:min:ss) with a short description. In the training details (Workout Details) below, the individual intervals with detailed time information and the load are listed.
e.g. 1:30 min stands for 1 min and 30 sec.
Example:
Total time of the training session 1:30:00 / 1 hour and 30 min
1. Warm Up
5:00 min with the indicated load values2. repeat 4 x
1st - Active - Z2
15min with heart rate / power ...2nd - medium Z3
5min with heart rate / power ...3. Cool Down
5:00 min with the indicated load values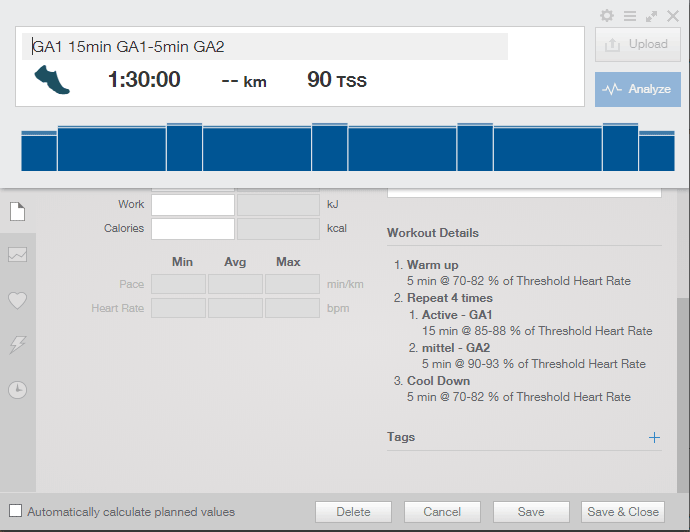
The load of the training session is indicated as the training zone, each with exact upper and lower values (in strokes per minute, power or speed).
Deviations pulse to the indicated range
In particular with short and intensive intervals it happens that the pulse "indulges" and does not seem to reach the indicated range. The reactions of the cardiovascular system are too slow to reflect the load in the muscles in a timely manner, here it is important to move in the right range by perceived effort and then expect the reaction delayed.
Stretching and / or stabilization trainingDaily stretching and stabilization training should be part of the general training program.
There are many forms of stretching, the most suitable should be found by everyone and incorporated into the daily routine. The stretching or stabilization/strength training will be entered under "Other". Depending on the athlete and the plan, at least 30 - 60 minutes are required for stretching and strength training per week.
However, every athlete should stretch for 10 to 20 minutes after appropriate training sessions.
Error devilIf we made a mistake and the information in the short description of the training unit does not match the training details, the detailed description always applies and the training is carried out according to this description.
We are very grateful for a short description of the day of training and the type of sport to fix the error
-
05. Training Zones
Training Zones Swim Time Bike Power Bike Heartrate Run HR Run Power Run Pace Bike & Run % from CSS % from FTP % from FTHR % von rFTHR % von rFTPower % von rFTPace % from max HR Zone 1: Recovery 84-86 45-54 60-67 70-82 50-78 69-77 50-59 Zone 2: Aerobic 92-94 57-74 70-82 85-88 81-87 79-87 60-69 Zone 3: Tempo 95-98 77-90 84-93 90-93 90-94 89-93 70-79 Zone 5: SubThreshold 99-105 92-105 95-104 95-99 95-99 96-100 80-89 comp. specific. Endurance 106-120 106- 120 90-100 Zone 5A: SuperThreshold 106-119 100-102 107-114 101-102 Zone 5B: Aerobic Capacity 103-106 117-125 105-120 Zone 5C: Anaerobic Capacity >120 107-120 >127 112-120 -
06. Entering the threshold values on the training platform to calculate the training zones
In general, the training zones can be reached and adjusted or viewed using the following procedure:
Athletes with the coaching option:
The trainer enters the zones individually according to load tests and requirements.
Athletes with a prewritten training plan
The training zones must be entered individually on the training platform in order to ensure optimum training control in the correct training zones. This is no problem, with the instruction below you can enter exactly the values determined from the field test (or an actual performance diagnosis).
Alternatively, you can use your own known values from performance diagnostics.
Please read the article
-
07. Training Methods
Main Article about Training Methods
Brick Training
The second training session (usually running) begins immediately after the first one. In the headline of the first session it is marked with " + Brick Run".
The second training session does not start with a Warm Up. You should be warm from the previous training session and the transition should take place quickly. Often there is no Cool Down in the first training session, but a instruction for the transition of the training session is given.
Special training sessionThese training sessions are completed several times during the season and serve as a reference for benchmarking.
Test Session
For running and cycling it is ideally one lap (or one section) on one of the normal "home course" with as few interruptions and traffic as possible.
For running there should be 5 - 10 km and for cycling 10 - 20 km or shorter laps, which can be run several times. -
08. Possibilities to adjust the plan for your regular training
Since not everything fits 100% in training and in life, you will find some information to adjust the plan to your needs.
The training session in the plan are structured and systematically built on each other. If the plan is simply too light, too short or too heavy or the perfect weather forces you to make a longer bike ride :-) can make the following adjustments.
For athletes with the coaching option, the coach writes the plan and minor adjustments should only be necessary on a daily basis due to weather changes or short-term plan changes
Individual adjustment possibilities of the unit length Running and cycling
long and easy training session with a very high Z2 percentage
Add the appropriate time in Z2 tempo to the end of the training session and/or extend the number of intervals contained accordingly.
Never extend the session by more than 30%.
more intensive training session Z3/ Z4/Z4/Z5-6
Do not try to lengthen units by extending the rest time between the intensive intervals, this will change the character of the training in most cases and may be counterproductive.
Option 1
Please make sure that the more intensive interval time is never 20% longer than the target distance and or time in your target race or that the intensive training time is only extended by max. 20%. Example bike split in the Olympic distance 90 minutes - maximum allowed intensive interval time 108 minutes (90min+18min).Example: Calculation
Original unit:
Repeat 10 x (5min Z2 - 5min Z3)
Calculation 10 x 5min Z3 = 50 min intensive total interval time
Extension by max. 20% of 50min = 10min ⇾ Thus, a maximum of 2 (x 5min) additional intervals may be added.Option 2
Single Session or second training in Brick Training: Continue the training after completing the intervals in Z2 pace Steady Effort to extend.Brick Training : Extend the training before you start the given intervals Z2 pace Steady Effort to slightly influence the load profile before the transition.
Swimming
Depending on the training content you can add/remove several repetitions of the main set,
Shorten: Cut down the length of the swim intervals is preferred first
Extend: Increasing the number of repetitions is preferablySample unit:
1. Warm Up
300 @ 01:49-01:53 sec/100m/y Warm Up.2. Repeat 2 x technique
- 50.0 @ 01:41-01:53 sec/100m/y - easy
- rest 30 sec @ 00:00 sec/100m/y3. Repeat 2 x Options to extend 2 x 250 or 300
- 200.0 @ 01:37-01:43 sec/100m/y - medium
- rest 30 sec @ 00:00 sec/100m/y4. 400 - maximum speed Options to extend 500, shortening option 300 or 200
- 400 m @ 01:30-01:31 sec/100m/y fast5. Repeat 10 x Options to extend 12 x 50 or 20 x 50 , shortening option 10 x 25
- 50 medium with and without PB alternating @ 01:23-01:30 sec/100m/y very fast
- Pause 45 sec @ 00:00 sec/100m/y6. Cool Down
200 m @ 01:49-01:53 sec/100m/y - RecoveryIn the first weeks the training is held more relaxed, partly the swimming units contain a specification for the extension of the unit, if available this should be used.
Open Water / Open Water Swimming
In the last training weeks before the race the training explicitly contains Open Water units.
If these cannot be done in open water, the training should be done in the swimming pool or outdoor pool.
If it is assumed that there is NO wetsuit allowed in the race, you should swim here in competition clothes (e.g. swimsuit).
Option 1 - Training in the swimming pool instead of Open Water
Whole or partly with neoprene suit, the Wetsuit can be worn here at least possibly in the outdoor pool only at the beginning, here please pay attention to the body temperature and take off Neo early.
As a substitute for the simulation of the neoprene suit you should always swim with pull buoy to simulate the load. Unless the race takes place without neoprene release.
Option 2 - Training in Open Water instead of swimming pool
This option should be used whenever possible. Here the given training has to be built into an open water swimming as exactly as possible.
Possible adjustments:
Break times as actual swimming breaks or very relaxed swimming.
Always built in some acceleration and intervals in a calm swimming.
Exchange of training session between training days
The exchange of training session is something quite normal and is possible.
In a training plan with less weekly volume, this is much easier due to time constraints.
Swimming units are always quite easy to swap. This makes sense if the swimming pool operation time is better suited for a different sequence of exercises or if a training session is better suited for open water swimming.
In addition, a swimming unit can always be placed on the recovery day, ensure that at least one recovery day is not used or only strength and stabilization training is planned.When exchanging session, make sure that the intensive training (Z3-Z6) are not trained on the same day or that an accumulation of intensive training occurs and the recovery between the training is given.
Brick session should be maintained as much as possible.The weekend training should preferably always be exchanged as a block, on a daily basis.
You can only make up for missed training sessions in the following 3 days if no recovery day or another training in this sport is missed.
If you have premium access to TrainingPeaks, you can also move future units, with a basic access this only works with past units.
-
09. Adjustments in the Training Plattform
-
10. Adjustments for a different race day
Adjustments for a different race day
Our training schedules are written for Races on Sunday. In reality this is not always the case. If a competition takes place on Saturday, postpone all units of the last 2 weeks by one day if possible.
If this is not possible, only postpone the last 7 days, this postponement deliberately creates a training-free regeneration day on Sunday.
Example 2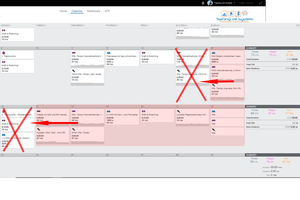
-
11. Abbreviations
Z1 - very easy - Recovery
Z2 - easy - Aerobic
Z3 - middle - Tempo
Z4 - hard - SubThreshold
Z5A - very hard - SuperThreshold
Z5B - very hard - Aerobic Capacity
Z5C - Anaerobic Capacity
IM - Interval method
SE - Steady effort
Rep. - Repetition
FL - Fartlek
Warm Up - float in / run in / bike in
Cool Down - Float out / Run out / bike out
R/Rest - Break
# / No. - Number
Drills - technique drills to improve your technique
Acceleration - each interval is equally fast, steady acceleration from slow to max. (or as specified)
Sprint - accelerate with maximum possible acceleration (explosive Power) up to top-end speed (or the specified value)
(For biking this means jump out of the saddle and accelerate against resistance in a big gear)Swimming
Free or FS - Crawl/Freestyle is the indicated stroke if nothing is mentioned
Back - Backstroke
Breast - Breaststroke
Fly - Butterfly, if you can't do Butterfly do Freestyle single arm drill 2 right / 2 left arm
IM - Individual Medley (use all four strokes: butterfly, backstroke, breaststroke and freestyle, in that order), if you can't swim butterfly swim catch up drill,
Off (Stroke) - any other stroke then freestyle
Descending - each consecutive swim is faster than the one before; the times descend, Example # 1. 1:50min, # 2. 1:45min, # 3. 1:40min, #. 4. 1:35min,
Negative Split - second half of a swim is faster than the first half; the time (split) for the second half is “negative” compared to the first half. e.g., 4 x200 1st 100 easy - 2nd 100 fast
Breathing - Hypoxia, swim more strokes without breathing, if you breathe regularly each two strokes, breathe now every three strokes
Kick - holding a kick board/Pull Buoy in front and kicking with your legs, if this is really hard for you use fins, otherwise assume none
Pull / Pb - Front crawl with a Pull buoy between thighs
Pads / Fp (FP) - Finger paddles (if you are an excellent swimmer use paddles)
start/exit time is the swimming time + the pause time.
An example, you should swim:
4 x 100 (No. 1 easy, and then each faster), the starting/exit time remains the same; P 20 sec.
then this means that the finish time of
No. 1 is:
1:30 min swim time + 20 sec rest time (start/exit time = 1:50min).
No. 2 (you swim faster).
1:27 min swim time and you start with the same start/exit time, so again after 1:50 min and thus have a break of 23 sec.
Thus the break becomes larger, with higher swimming speed. -
12. Last but not Least
That was a lot of theory now - sorry.
You shouldn't lose the fun of training. You will notice, after a couple weeks you will get more and more routine.It is very valuable to be able to train and spend our free time with something so enjoyable.
Don't let a failing technique, a missing heart rate belt, a not working Bluetooth transmission or the wrong weather stop you. Take a deep breath and enjoy the training.
If necessary, even without a high-tech pulse watch, bike computer, with the wrong sneakers or leaky swimming goggles, ... I'm sure you can continue this enumeration ....If it has to be, even disregarding the actual training instructions ;-)
Have fun with your training.
The team of training with system
If you still have wishes, or we are missing something, let us know!
Contact us!
 Phone
Phone Landline: +49 - 3834 - 3189895
Mobil: +49- 178 - 9758558 Skype
SkypeOur Skypename is:
Skype-t-m
Your benefits with us:

Fast delivery
Usually within 24 hours.

Very Good
Quality has priority

Sustainable
All plans can be reused as often as required.

Exchange service
Plan exchange or return within the first 21 days.

Hight Quality Service
Direct availability or callback in case of questions
Talk to us  Phone: +49 - 3834 - 3189895 or Contact Support
Our Team:

Takao Mühmel

Pete Ventura

Marcel Mithöfer
Marc Wolf

Marcus Schmidt
 EN
EN  DE
DE 

